Showing posts with label remodel. Show all posts

Saturday, January 26, 2013

Boys Room update!

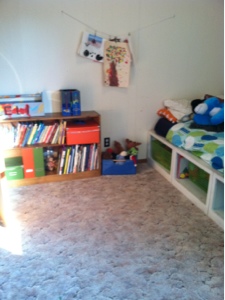
It's done! Well until we get/build bunk beds and get/ build a desk. But for now the room is much less cluttered! For now I just took the toys out but we'll see what happens to them. I'm hoping this will decrease the fighting too. New rule is if they fight over a toy they lose it for 4 days!

I'm blogging from my phone and the blogger app doesn't let you put the pics in the post with words so I can't actually describe each pic but they're pretty self-explanatory. ( side note, I had a different app to blog with that I loved but it started having problems so I deleted to reinstall and update - I have a new apple id so had to do that- but it's not free anymore :(. I rarely ever will pay for an app so I'm using this one but it sucks so I might just have to breakdown and spend $1.99...)

Anyway, I took out Eli's bed and brought in the two tables. The tall one I put the fabric on to cover the cords for our Internet and router ( I'll dewrinkle it soon). On that table I put Rowan's tool box filled with plastic cups to hold art supplies ( probably get something more permanent eventually). That table is where they can keep their lego creations. There won't be much room so they won't keep every little thing they build...

The rest of the room basically just got cleaned up. They had random Legos all over the bookshelf that I picked up. The giant Rubbermaid container was stuffed full of toys and that's what we took out! I was going to let them each pick 5 toys to keep but they weren't acting very good this morning so I didn't give them a choice!

The green toy box under the table holds all the toys! ( except for train tracks, Lincoln logs and costumes that are all under the bed and hexbugs and Legos by the lamp table) I kept the play food, two of those echo microphones, and a few other toys that I decided were ok. We also have blocks and a box of small cars. No more random crappy toys especially ones from happy meals! :)

As soon as the art stuff was out they sat at the table and started drawing! Yes!! Success! :)




Sunday, January 6, 2013

Bathroom/Laundry Remodel

Last February we started remodeling our bathroom and laundry room.  We didn't do everything since we do want to sell the house and really didn't want to put that much money in it.  If we planned to stay here forever we would have done a lot more (mainly new bathtub!).  I'd been meaning to blog this forever and just never got around to it.... All pics are from my iphone so not the best quality but you get what's happening.
 
PhotobucketPhotobucket
This was the "wall" between the bathroom and laundry room. On the right is the bathroom door with robes on it. The part with the mirror slides to the left and the part on the left slides to the right.  Nice, huh? The best part- it's all just plywood :/ (Don't ask me why we didn't fix this years ago...)
 
Photobucket Photobucket
The other side of the bathroom
 
Photobucket
Close-up of the awful plastic tile.  We painted the top pink to try and go with the tile.  It worked, I liked the pink for the most part, it didnt look as bad in real life.
 
Photobucket Photobucket Photobucket
The left picture is with the mirror door open and the view into the laundry room. Middle pic is the view from the kitchen (that's the back door). The pic on the rightIs the view back into the bathroom.  The laundry room had a cabinet like the bathroom- they were one piece built together.  I forgot a pic of the ceiling here- we had a leak from a big storm.  That's what started this whole thing and we had to have some roof work done too.
 
 
Photobucket
My belly! :) (This was last February so I was like 23 weeks or so)
 
Photobucket
There was a small leak above the shower too, plus those awesome drop ceilings!
 
Photobucket Photobucket Photobucket
Mike taking out the built in cabinet- it was all pieced together with plywood too.  Picture on the right is the view from the bathroom after the whole "wall" was down.
 
Photobucket
The wall next to the bathroom door, we discovered it used to be an outside wall! (Also, ewww ugly fake brick outside??)
 
 
Photobucket Photobucket
We really liked having the easy access to the laundry room so we decided to do a pocket door instead of just a wall.  This was the part of the remodel where we had to wait for other people to be able to help us so we lived with that half a wall/door for several weeks.  Mike had started to take down some of the ceiling tiles too so he could see what we were dealing with up there.  He did this above the shower too.  I hated taking showers during that time, I kept thinking a mouse would come from the attic through the installation!
 
 
Photobucket
Mike had some friends come help with the drywall (apparently a weak pregnant woman isn't very much help!) and they installed a fan with the new light since there wasn't a fan in there.
mp;current=iPhone3100_zps64ba1a90.jpg" target="_blank">Photobucket
Laundry room- drywall ceiling
Photobucket
Bathroom- new light and drywall ceiling
Photobucket
Drywall next to the pocket door
 
PhotobucketPhotobucket
We went with a neutral color and did it on both the plastic tile and the wall
 
Photobucket
All the trim and moulding got painted white
Photobucket Photobucket Photobucket
So much better!! I got a new shower curtain (I did LOVE my old one though) white towels and rug (not a good idea with little boys btw). We thought about replacing the vanity but it was too pricey and it really didn't look bad once the rest was updated. 
 
Since we lost a lot of storage with this remodel Mike built this shelp for me! (plans on ana-white.com) It looks purpley on here but is more blue.  He got those great jars at a garage sale and they hold q-tips, cotton balls.  It'd look better if I had all white towels stacked nicely, but that's not reality ;) and the hamper sits next to it in front of the window (the pocket door is to the right of the blue shelf).
 
Photobucket
I didn;t take many after picks of the laundry room- oops! We got a cheap cabinet at the Habitat for Humanity Restore and just put 2 wire shelfs next to it to hold stuff. We did this room all white.  The wall where the built in was is all white.
 
 
Photobucket
Here's a side by side looking at the shower
 
Photobucket
and the other side- hard to believe it's the same room!
 
We still love what we did! Both rooms had new floors put down a few years ago so we didn't have to worry about that.  Now we are planning some more changes- we recently discovered most of our rooms have wood floors! I LOVE wood floors! So we are thinking of ripping up some old carpet- the downside is that the dining room (the one room I hate having carpet!) doesn't have hardwood :( So trying to match it (really don't want to try and refinish them all since they look so good) might be hard...but hopefully it'll work out! We also want to paint the kitchen cabinets! SOmething I've wanted to do for years and Mike has been against- he finally sees things my way- woohoo!
Of course, I'd rather do nothing and just sell this house......